Disclaimer:The procedure described below is risky and could cause bodily harm. If you follow any of the notes below, you do so at your own risk! You may notice that these are notes on how I made this battery replacement. They are not intended to be instructions for you to carry out. If you decide the risk of the battery blowing up is worth it, then this is your decision!
I started my Polaroid camera collection 18 years ago and would often find good No. 532 batteries in the cameras I bought. Well, all of these batteries have gone beyond their shelf life, so I decided to take the risk and try creating a replacement instead of buying a new one for $7.00 from Polaroid. The cost of the battery is more than what the camera is worth--double if you need two of them!
First, I gathered the following materials:
| I got this idea when I saw a No. 223 battery for sale for only $2.00. I looked at the battery and noticed that it really was 2 3.0 volt batteries, which would work perfectly as a direct replacement to the No. 532 3.0 volt battery. And, the fact that they were lithium batteries is a plus, since they have a very long shelf life. Polaroid recommended changing the alkaline No. 532 battery each year. The lithium battery should last 7 or more years. | 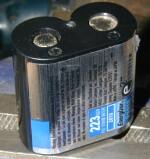
|
| First, I cut off the non-exposed end of the battery case. I was careful not to cut the batteries! | 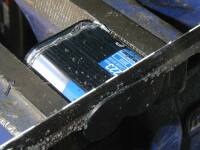
|
| The batteries then slid out easily. After sliding them out, I cut the solder tabs off the end of both batteries. I initially thought that the solder tabs would come in handy for soldering on connectors, but they're too flimsy. | 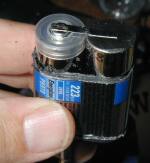
|
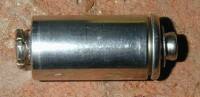
| Second, I drilled off the snap on connectors from both sides of an existing No. 532 battery. I found that I was actually not drilling into the battery proper, but a separate metal plate which the snap on connector is soldered to. Drilling it off is tricky. I have good drill bits, so I was able to center the bit well. The procedure is similar to drilling out a rivet. | 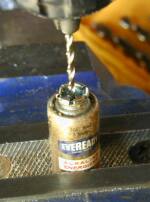
|
| Third, I prepared the positive end of the battery by applying a glob of solder to it. I did this by using the hottest setting on the solder iron (135 watts), putting a gob of solder on the tip of the iron, making sure it was nice and hot, then touching the glob to the positive end of the battery while applying a tiny bit more solder to allow it to stick. I made sure the solder iron was not on the battery more than 2 seconds. I figured anymore than 2 seconds could cause the battery to explode. It may be that the battery could explode even if you touch the iron to the battery for a split second, though I was successful with 2 seconds. I realized that this is the riskiest part of the procedure. Eye protection, welder's gloves, a face mask, full body protection, and a fire extinguisher are a must, plus I wouldn't use a soldering iron under 135 watts. The possibility of the battery exploding is a real danger that must be taken seriously. | 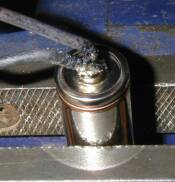
|
| Fourth, I prepared the smaller snap on connector by applying a glob of solder to it. This is essential to minimize the bonding time between the snap on connector and the battery in the next step. | 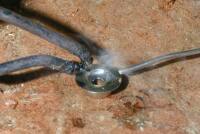
|
| Fifth, I picked up the snap-on connector with a pair of needle nose pliers, and applied the solder iron to the top while holding it in the air (NOT while holding it to the battery). After the connector was hot and the solder was melted on the connector, I carefully lowered the connector and placed it on the battery, all the while keeping the solder iron on the connector. I found it took only a second for the solder on the battery to melt and bond with the connector, at which time I immediately removed the soldering iron. The other thing that I needed to watch carefully was that the snap on connector did not come in contact with the lip of the battery, which is the negative terminal. If this happened, the battery would short out and possibly explode. | 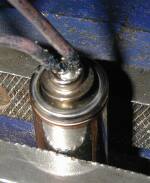
|
| In some ways, the positive end is the hardest to do, since you have to watch all sorts of things at once while applying the snap-on connector to the plus side of the battery. Coordination, steady hands, and good eyesight were essential in producing this end. | 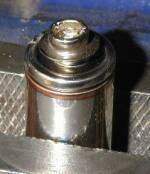
|
| Next, I did the negative end in the same way. Applying solder to the negative end of the battery is riskier and more difficult, since you are applying heat directly to the battery, and not a rise in the battery such as is on the positive end. Making the solder stick was tricky, and I had to do it all in under 2 seconds (wearing full body protection with a fire extinguisher handy--why do they make batteries so dangerous anyway??). | 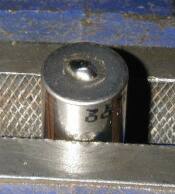
|
| Again, I applied a glob of solder to the bigger snap-on connector, then picked it up with the needle nose pliers, and while touching the soldering iron at high heat to the top of the connector, lowered it onto the battery, making sure that the iron was not in contact with the connector while it was in contact with the battery for more than a second. | 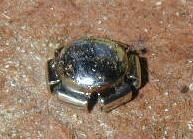
|
| The negative end is also tricky because the bigger snap-on connector is hard to pick up and hold with the pliers. Also, the high powered solder iron is actually magnetic when turned on, so when you take it off the connector, if you don't have a firm hold on it with the pliers, it may magnetically stick to the solder iron. I found it was better to turn off the solder iron before lifting it off the connector. | 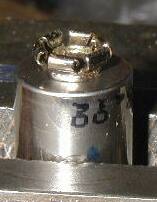
|
| Here's the finished product, installed into a Model 350 camera. Can you guess which battery is my first attempt? The top one! Notice the connectors are a little crooked... The thing I like about this battery replacement is that it did not require any modification to the camera itself. It only required my taking a risk of the battery exploding, thereby potentially losing my eyesight, attaining 2nd degree burns, and starting my workshop on fire! | 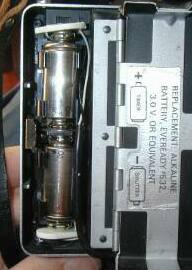
|