Pack Film Techniques: Image and Emulsion transfers
What are Transfers?
Image transfers are done while the film develops. Instead of using the normal print paper, another receiving surface, such as watercolour paper, is used. The effect is a softened, more diffused picture. I've also had some success doing image transfers to a desk.
Emulsion transfers are done after the print has dried for a while. The emulsion is actually lifted from the original print and transfered to another surface, like paper or even a hard surface. This only works with Polacolor film.
Why do transfers?
Good question! There's something about manipulating the process of producing a picture which brings out a different artistic aspect to photography.
And, it helps understand the actual diffusion process of Polaroid film. Transfers take some of the mystery out of the nature of pack film. Plus, if you ever get bored of taking normal Polaroid pictures, transfers can breathe new life into Polaroid picture taking. I'm sure Polaroid doesn't mind selling the film for transfers! The even sell emulsion transfer kits complete with all you need to do emulsion transfers.
What's a good camera to use?
Any 100 series pack film camera will work. Check the camera chart to see which cameras are pack cameras. You can also read my opinion on purchasing a Polaroid camera.
Image transfer instructions:
Remember you can only use Polacolor film for this process
Compose and take the picture, but don't pull the film out of the camera
Soak a piece of heavy paper (watercolour paper works well) in warm water for 1 minute
Take the paper out of the water and lay it on a flat surface
Squeegee the paper, leaving it on the flat surface
Pull the film out of the camera and wait around 15 seconds before peeling apart
Peel the negative off of the print and quickly lay it face down on the soaked paper
Use a rolling pin to roll over the negative 5 or so times
After around 2 minutes, peel away the negative slowly
Let the transfer dry by hanging it up
You can add colour with watercolour paints or coloured pencils
My experience with Image transfers:
The receiving surface needs to have some texture so that the diffusion process while developing will have something to stick to. A smooth surface doesn't work very well-- when you peel up the negative from a smooth surface, the picture stays on the negative, though you might get some blotches of the image to transfer.
It works better if the receiving surface is wet, unless it's a hard surface, like a semi-gloss or matt painted desk.
It's really important to wait 15 seconds before peeling apart the film. If you don't wait long enough, I don't think the negative develops fully and the transfer is lower in contrast. When you peel apart the film, some of the yellows will have already transfered onto the paper. This is normal.
Emulsion transfer instructions:
You'll need the following:
2 trays big enough to hold your print
160 degree water, and cold water
an acetate sheet
tongs (unless your fingers can take hot water)
a rubber roller, or you can try a rolling pin
Steps:
Put the acetate sheet in the cold water
Soak the paper you will be transfering to in cold water for a few seconds, then remove and squeegee it
Soak a Polacolor print that has dried at least 12 hours in the 160 degree water for 4 minutes (face up)
Put the Polaroid print in the cold water and push the emulsion from the edges while it's underwater
Peel away the emulsion from the paper and flip it over
Remove the old paper from the tray
Stretch out the emulsion on the acetate sheet and try to remove the wrinkles by moving it and out of the water
Take the acetate sheet with the emulsion out of the water and place it upsidedown onto the receiving material
Carefully remove the acetate sheet
Stretch or manipulate the emulsion as desired
Using a rolling pin, or better yet, a rubber roller, start in the middle and try rolling out the air bubbles
Hang to dry
Emulsion transfer experiences
Emulsion transfers are very cool. You have to try it at least once.
Only Polacolor (108 or 669) film works well. I tried Studio film and the emulsion lifted and broke apart by itself while in the hot water.
When the print is in the hot water, nothing seems to happen, but after 4 minutes, it's ready to start peeling off.
The white border is peelable as well. If you try peeling the emulsion where the picture begins, you're going to have to literally cut the emulsion from the border. Try peeling right from the edge of the print. Once it starts peeling, it goes pretty easily--if you can get ahold of it OK. It's pretty slimey!
I tried 689 (Pro Vivid) film and the emulsion lifted OK, but the emulsion is quite different from 108 film. It almost has a plastic consistency and isn't slimey. You can actually feel and hear it krinkle as you work with it. It's very robust compared to 108 emulsion. Because of this, it's not very flexible or subtle when trying to stretch it or put wrinkles in it. But, if you keep it on the acetate sheet, it makes a great overhead transparency!
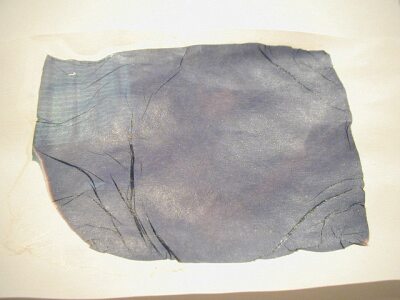
This is an example of an emulsion transfer using 108 film. The picture was way too dark, so was suitable for experimenation. The emulsion was slimy and easily stretchable or wrinklable.
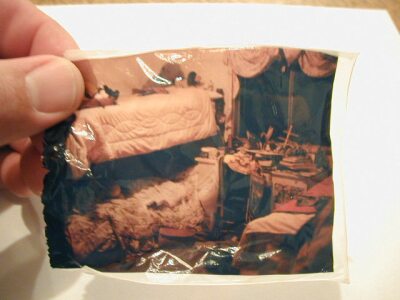
This is an example of an emulsion lift using 689 pro vivid film. I'm actually holding the emulsion by itself in this photo. Notice the robust nature of 689 emulsion. Even when it's wet, it supports itself and is quite stiff. After it's dry, you can handle it almost like a transparency.